Do You Plug Hdmi Into Gpu Or Motherboard – Complete Guide
Sick of looking for the HDMI spot on your computer? It doesn’t matter if you’re good with tech; figuring out whether to plug in your HDMI cable to the GPU or motherboard can be as puzzling as solving a Rubik’s cube with your eyes closed.
If you have a dedicated graphics card (GPU), plug the HDMI cable into the GPU.If your system lacks a dedicated GPU and relies on integrated graphics, connect the HDMI cable to the motherboard.
This article will help you understand the HDMI connection puzzle. We’ll explain the maze of graphics processing units and motherboards.
Understanding GPU and Motherboard Roles:
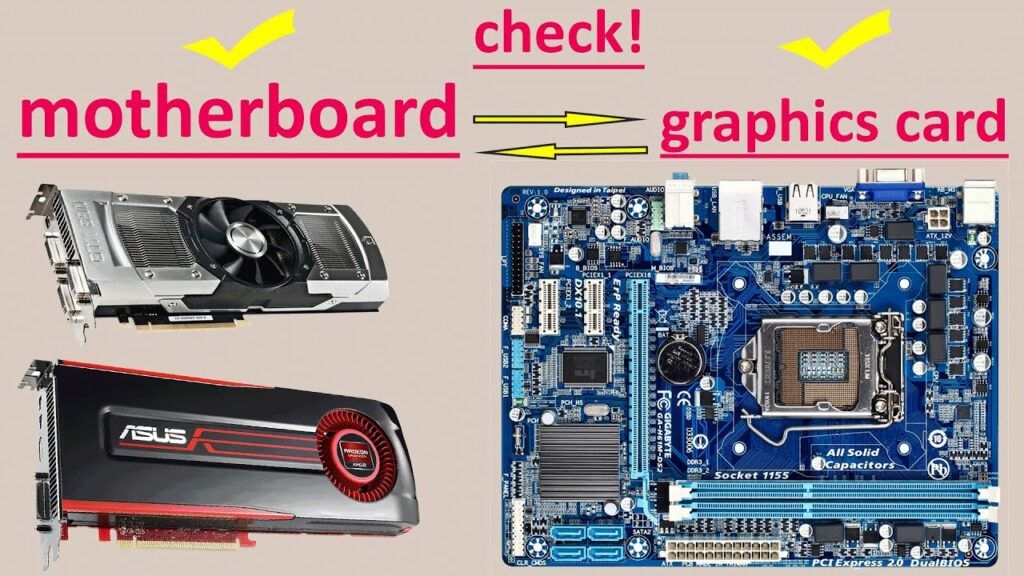
It’s crucial to grasp the functions of the GPU and motherboard in managing graphics to make the right choice. The GPU specializes in rendering and processing graphics, while the motherboard is the central hub linking different components, including the GPU.
1. Gpu – The Graphics Powerhouse:
The GPU, or Graphics Processing Unit, is the core of visual processing on your computer, handling images and videos with remarkable detail.
For optimal performance, connecting your HDMI cable directly to the GPU is recommended. This is particularly beneficial for users involved in activities like gaming, graphic design, or video editing.
The GPU’s dedicated video output ports ensure efficient processing of graphics-intensive tasks, resulting in superior display quality and smoother performance.
2. Motherboard – Integrated Graphics:
Alternatively, specific systems feature integrated graphics on the motherboard. While these built-in processors are usually less potent than dedicated GPUs, they can manage routine tasks and primary graphics display.
If your computer relies on integrated graphics, connecting the HDMI to the motherboard is essential. If your CPU has integrated graphics, plugging your HDMI cable into the motherboard makes sense. This way, you will be utilizing both the power of your processor and its built-in GPU
Determining Your System Configuration:
When connecting your HDMI cable, the question arises: do you plug it into the GPU or motherboard? The answer lies in understanding your system configuration.
If you have a dedicated graphics card, plugging the HDMI cable directly into the GPU is the way to go. This ensures that you are utilizing the full power of your graphics card and enjoying enhanced visuals and performance.
On the other hand, if you rely on integrated graphics provided by your motherboard, then connecting the HDMI cable to the motherboard’s port makes more sense.
It’s important to note that using your dedicated GPU for graphics-intensive tasks like gaming or video editing will yield far better results than relying solely on integrated graphics.
Connecting your HDMI cable directly to the GPU allows seamless communication between your monitor and dedicated graphics card, resulting in smoother frame rates and sharper picture quality.
Benefits Of Connecting HDMI to GPU:
GPU (Graphics Processing Unit) is designed for graphics-intensive tasks and high-quality visuals. Plugging HDMI into GPU ensures that image processing and display tasks are handled efficiently.
Improved Performance In Gaming And Video Playback:
- Modern GPUs have dedicated hardware for video decoding and encoding.
- GPU handles these tasks more efficiently than a motherboard’s integrated graphics chip.
- Results in smoother gameplay with higher frame rates, reduced input lag, and enhanced video quality during streaming or watching movies.
Support For Multiple Displays:
- Plugging HDMI into the GPU allows for multiple display setups.
- Many modern GPUs support multiple monitor configurations natively.
- Enables easy extension or duplication of the screen across different displays without external adapters or software configurations.
How To Connect HDMI to GPU: Quick and Easy Steps:
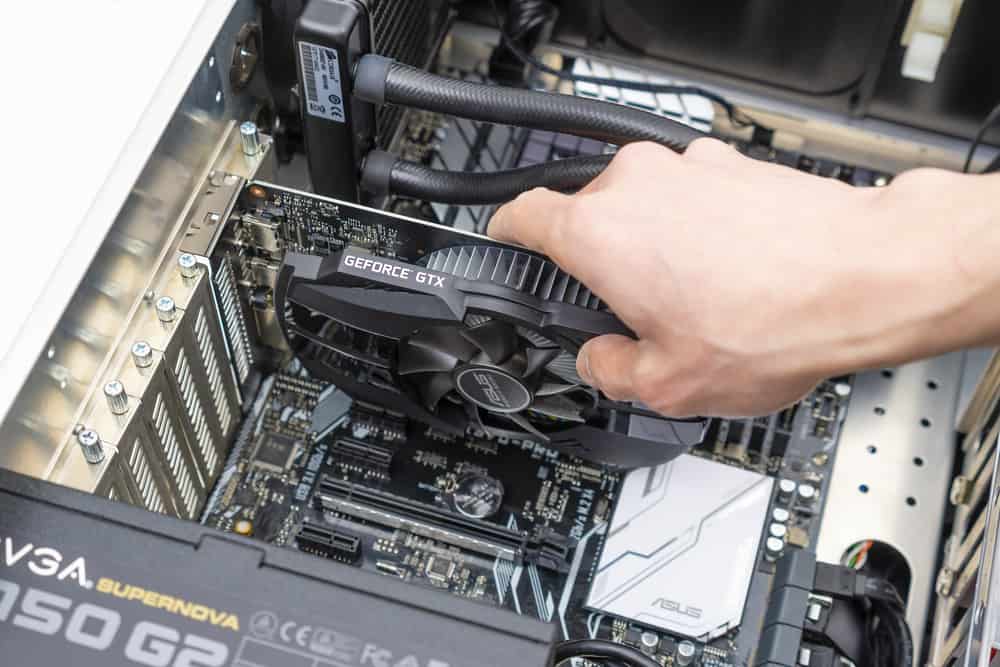
- Identify Your GPU:
Look for the separate graphics card plugged into your motherboard.
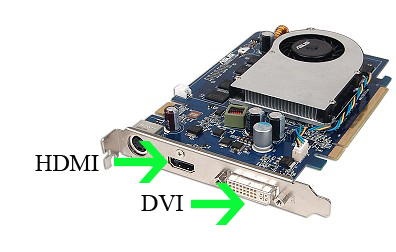
- Locate the HDMI port on your GPU:
Locate the HDMI port on the back of your GPU, usually grouped with other video output ports.
- Check HDMI cable Compatibility:
Ensure you have an HDMI cable that matches your GPU’s HDMI port (HDMI 2.0 or later).
- Power Off Your Computer:
Turn off your computer to prevent electrical issues.
- Plug In HDMI Cable:
Connect one end of the HDMI cable securely to the GPU’s HDMI port.
- Connect The Other End:
Attach the other end of the HDMI cable to your monitor or TV.
- Power On Devices:
Turn on your computer and the display device, setting both to the correct HDMI input.
- Check Display Settings:
Right-click on your desktop, go to display settings and confirm the external display is recognized.
- Modify The Resolution And Refresh Rate Settings:
Set the resolution and refresh rate to match your monitor or TV specifications.
- Test The Connection:
Open a video or play a game to ensure the HDMI connection to the GPU is working correctly.
Benefits Of Connecting HDMI to The Motherboard:
Compatibility And Integrated Graphics Of Motherboard:
- Connecting HDMI to the motherboard can prevent potential compatibility issues.
- Some motherboards have integrated graphics capabilities for decent video output.
- Enables continued computer use even if the dedicated GPU malfunctions or requires replacement.
Quick Sync Video Technology:
- Plugging HDMI into the motherboard allows access to Quick Sync Video technology.
- Quick Sync Video is a feature in Intel CPUs with integrated graphics.
- Accelerates video encoding and decoding tasks through built-in hardware encoders and decoders.
- It is particularly beneficial for improved workflow and user experience in video editing or streaming applications.
Drawbacks of Using Motherboard HDMI:
- Limited Graphics Power:
Integrated graphics on the motherboard are often less potent than dedicated GPUs, leading to lower overall graphics performance.
- Reduced Display Features:
Motherboard HDMI may lack support for advanced features like high refresh rates and multiple monitors, limiting the visual experience.
- Shares Resources With Cpu:
Integrated graphics share system resources with the CPU, potentially causing performance bottlenecks, especially during graphics-heavy tasks.
- Struggles With Graphics-Intensive Applications:
Motherboard HDMI may face challenges handling demanding applications, resulting in lag or lower frame rates.
- Dependent On CPU Performance:
The performance of integrated graphics relies on the CPU’s capabilities, making GPU upgrades more complex than dedicated graphics cards.
- Limited Gaming Experience:
Gamers may experience restrictions in graphics quality and frame rates when using motherboard HDMI.
- Incompatible With Advanced Displays:
Integrated graphics may not be compatible with advanced display technologies, limiting the use of high-end monitors or TVs.
- No Hardware Acceleration Support:
Motherboard HDMI lacks support for GPU-based hardware acceleration, slowing down tasks like video editing or 3D rendering.
- Difficulty In Upgrading Graphics:
Upgrading graphics capabilities often requires a dedicated GPU, which may need additional slots or power connectors unavailable on the motherboard.
- Reduced Future-Proofing:
Motherboard HDMI configurations may need to be updated quickly, limiting the ability to keep up with evolving graphics requirements in software and applications.
How To Connect HDMI to The Motherboard: Simple Steps:
Connecting your HDMI to the motherboard is straightforward, mainly if your system relies on integrated graphics. Here’s a quick guide to help you set it up:
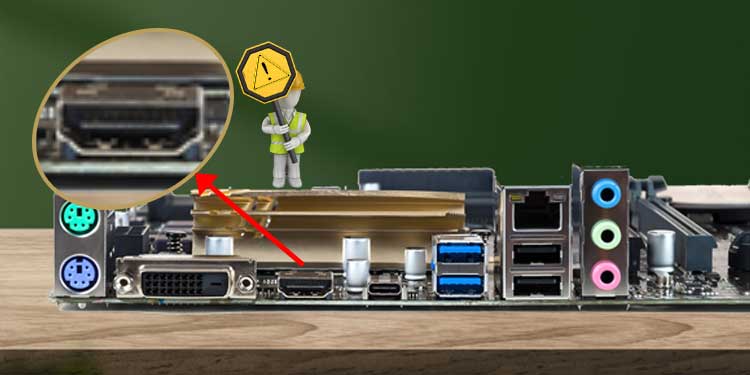
- Locate the Motherboard HDMI Port:
Identify the HDMI port located on the rear side of your computer, typically situated in close proximity to the USB ports and audio jacks.
- Check HDMI Cable Compatibility:
Ensure you have an HDMI cable compatible with the HDMI port on your motherboard.
- Power Off Your Computer:
Turn off your computer before making any connections to avoid electrical issues.
- Connect The Hdmi Cable To The Corresponding Hdmi Port:
Securely insert one end of the HDMI cable into the HDMI port on your motherboard.
- Connect The Other End Of The Hdmi Cable:
Attach the other end of the HDMI cable to the HDMI input on your display device, whether it’s a monitor or TV.
- Power On Your Devices:
Power on your computer and the display device, setting both to the correct input source (HDMI).
- Check Display Settings:
Right-click on your desktop and navigate to display settings to confirm that your system recognizes the external display connected via HDMI.
- Adjust Resolution and Refresh Rate:
In display settings, ensure that the resolution and refresh rate match the specifications of your monitor or TV.
- Test the Connection:
Open a video, play a game, or navigate through your desktop to ensure the motherboard’s HDMI connection is working correctly.
By following these simple steps, you can connect your HDMI cable to the motherboard.
Troubleshooting Tips While Connecting HDMI to GPU or Motherboard:
1. No Display From GPU:
If you encounter a situation with no display upon connecting to the GPU, ensure that the GPU is securely inserted into the PCIe slot and that the required drivers are correctly installed.
2. Integrated Graphics Disabled:
Verify the BIOS settings to confirm that integrated graphics are not disabled when connecting to the motherboard.
Conclusion:
In conclusion, when connecting an HDMI cable, it is essential to plug it into the appropriate port. For those using a dedicated graphics card, plugging the HDMI cable into the GPU is crucial for optimal performance and visual quality.
On the other hand, if you are relying on integrated graphics, plugging the HDMI cable into the motherboard is the way to go.
By understanding these distinctions and making the correct connection, you can enjoy a seamless multimedia experience.
So, next time you’re setting up your system or troubleshooting display issues, double-check where you should plug in that HDMI cable. Your eyes will thank you!
Frequently Asked Questions:
1. How Do I Know If My Computer Has A Dedicated GPU?
You can check by looking at the specifications of your computer or by opening up the device manager and checking for a separate entry under Display Adapters.
2. Can I Connect My HDMI Cable To Both The GPU and Motherboard Simultaneously?
In most cases, this is not recommended. Connecting to both may lead to conflicts, and the system will likely prioritize one source over another. It’s best to choose the GPU or motherboard based on your needs.
3. What If My Gpu Doesn’t Have An HDMI port?
If your GPU lacks an HDMI port, you can use an adapter or alternative ports such as DisplayPort or DVI, depending on your monitor’s compatibility. Alternatively, you may use the HDMI port on your motherboard if it has integrated graphics.
4. Can I Switch Between GPU and Motherboard Graphics Without Physically Changing The Cable?
You can switch between GPU and motherboard graphics without changing the cable. However, you’ll need to adjust the display settings in your operating system. This adjustment can usually be performed within the display settings or the graphics control panel.
5. Are There Any Performance Differences Between HDMI, Displayport, And DVI?
While HDMI, DisplayPort, and DVI can transmit high-quality video, they have differences in terms of maximum resolutions, refresh rates, and additional features. The choice depends on your specific requirements and the capabilities of your monitor and graphics card.